Nintimdo RP
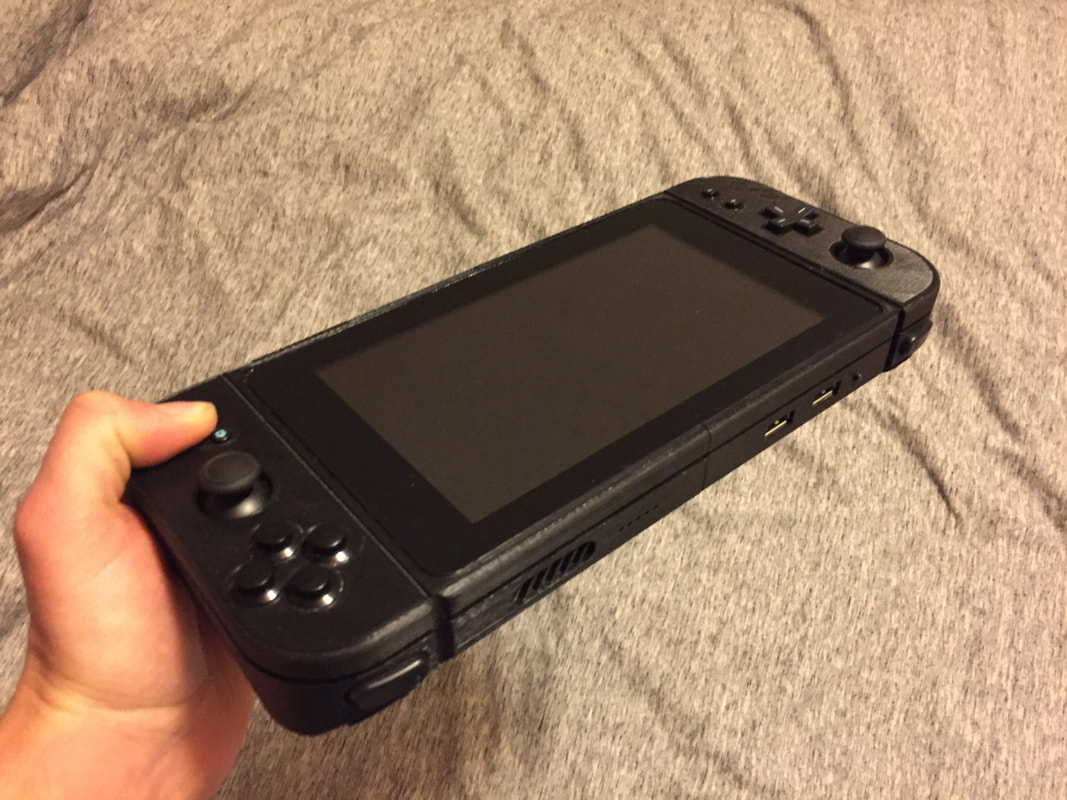
This project was to create a portable gaming system that could also double as a portable computer. The goal was to create a console that was functional as well as aesthetically pleasing. I use what I learned with 3D modeling to make professional looking cases to house my circuits. I went with a chamfered look on top to avoid it being a solid brick. The hand holds are also narrower regions and from the side make the device look significantly skinnier. A line around the entire device breaks up the thickness evident in previous revisions. The back hole is the air intake which flows out the top vent. The trigger buttons are angled to fit the hand better. Buttons were constructed using tactile components behind a stripped façade this is because I had no way of creating the silicone bouncing layer most controllers have today. So instead of shorting a PCB to register a button press, I'm just pressing a tactile button underneath. To get more bounce out of the mainly used buttons ABXY I bought them as an entire unit that just fits into the holes.
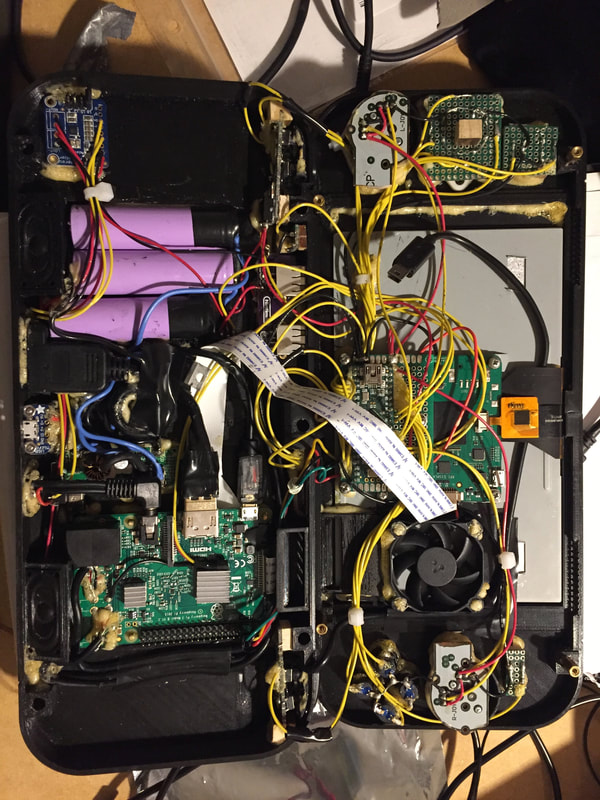
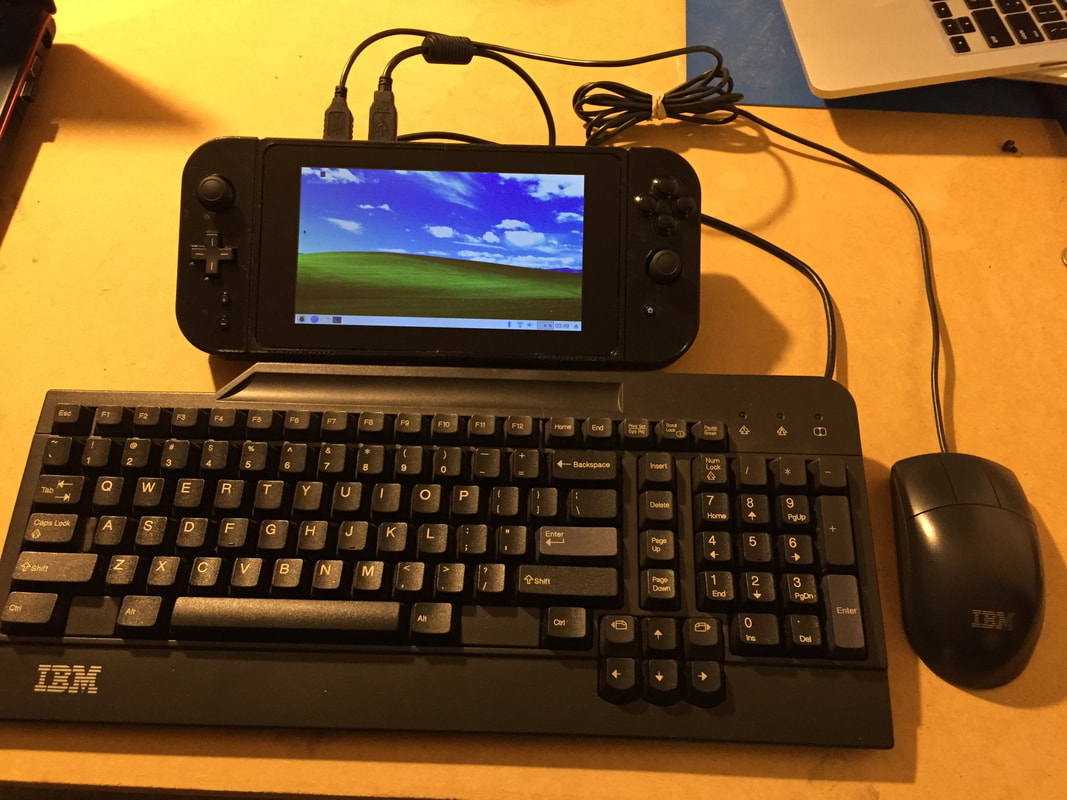
Inside is a Raspberry Pi 3 installed with a software called Retropie. This comes preloaded with developers emulators to run many classic games. It also comes with EmulationStation which is responsible for the nice graphical front end. I also installed pixel to get to a more familiar desktop environment. The Raspberry Pi interfaces with the 7-inch touchscreen on the front to display the GUI. Buttons are wired to a microcontroller and finally to the motherboard so games can be played. Thermals are controlled by bringing air in through an intake located on the back. The air is directed past heatsinks on the processor and graphics card, this then goes through the fan and into a duct system that routes the exhaust out of the top of the device.
On the top, there are two USB ports for external serial communication (mouse, keyboard, extra controllers). There is also a 5 LED indicator (blinks randomly on boot, battery level indicator, volume indicator, screen brightness) as well as the ON/OFF button (press once for battery level). Using the button sequence select+up will turn on the LED to full brightness to be used as a flashlight (it's blinding!). On the bottom, there is a micro USB used to charge the internal 10,000mAh battery which runs the whole show. The battery is wired to the source and gate of a PMOS transistors when you turn the device on the battery to gate disconnected and the gate is now shorted to ground through a 1M ohm resistor turning it to the ON state. Power down sequence is done by holding the top ON/OFF button which fires an interrupt after being held for 5 seconds to enter the shutdown sequence. There is a 3.5mm headphone jack which cuts power from internal speakers and redirects it through this port when in use. Lastly, there is an HDMI out port on the bottom which disables the 7-inch touch screen and redirects the video and audio to the new source. On the front, we have all the buttons and touchscreen. A neat feature is the “home button” which takes the user back to the main screen to choose what console and game to play by internally sending a signal to the Pi to mimic shorting of start and select. Volume is controlled by the two tactile buttons which increment and decrement the volume through a daemon running called "triggerhappy" which follows the script I wrote to send the correct gain adjustment to amixer. Brightness is controlled similarly by holding select + the two tactile buttons this time to adjust the value in /sys/class/backlight/rpi_backlight/brightness. The LED indicator is controlled solely by the Teensy microcontroller. Debounce for the buttons is written into the software.
My future plans for this device are to have secret “Easter eggs” where you can hold certain buttons on boot to enter the CLI or Linux GUI instead of the default emulation software. I also want to make hardware shortcuts for changing settings rather than plugging in a keyboard and typing the command. I also want to develop an audio card to filter out the high-frequency pop that occurs before the start of each game and unify the dB gain between each console. Lastly, I want old arcade games to be able to be played vertically to get the most vertical screen space. This would mean physically turning the device sideways using the right analog as your directional (everything would be adjusted 90 degrees CCW) and ABXY as any of your buttons.
In hindsight, I wish I did the HDMI out port with a PCB instead of a pre-bought female wall mount. This would have saved on a lot of space in actuality I had to tuck the cable in a spiral to avoid cutting it and re-soldering the 19 wires. I am torn about going with a smaller battery because the cell height was my limiting factor in the thickness of the entire device. However, reducing this would negatively impact my battery life.
In total, this costs me around $350 to make. This does not include the raspberry pi I broke trying to shave down the size... Still happy I tried it out. It was a fun summer project to see if I could make it as compact as possible while at the same time fitting a lot of cool features inside.
Installing ROMs is a legal grey area. Many online sources state you can download games if you own physical copies or if they are in the public domain. Another thing on this subject, I want to make it clear that I will not be selling or producing any more of these. It was a one time build for personal use.
In the end, you can't beat the experience of playing the original games on their true hardware. The system I created takes my favorite childhood games and makes them portable. However, every now and then I still dust off my old consoles to play again.
Feel free to ask me a question in the comments box below!
This project was to create a portable gaming system that could also double as a portable computer. The goal was to create a console that was functional as well as aesthetically pleasing. I use what I learned with 3D modeling to make professional looking cases to house my circuits. I went with a chamfered look on top to avoid it being a solid brick. The hand holds are also narrower regions and from the side make the device look significantly skinnier. A line around the entire device breaks up the thickness evident in previous revisions. The back hole is the air intake which flows out the top vent. The trigger buttons are angled to fit the hand better. Buttons were constructed using tactile components behind a stripped façade this is because I had no way of creating the silicone bouncing layer most controllers have today. So instead of shorting a PCB to register a button press, I'm just pressing a tactile button underneath. To get more bounce out of the mainly used buttons ABXY I bought them as an entire unit that just fits into the holes.
Inside is a Raspberry Pi 3 installed with a software called Retropie. This comes preloaded with developers emulators to run many classic games. It also comes with EmulationStation which is responsible for the nice graphical front end. I also installed pixel to get to a more familiar desktop environment. The Raspberry Pi interfaces with the 7-inch touchscreen on the front to display the GUI. Buttons are wired to a microcontroller and finally to the motherboard so games can be played. Thermals are controlled by bringing air in through an intake located on the back. The air is directed past heatsinks on the processor and graphics card, this then goes through the fan and into a duct system that routes the exhaust out of the top of the device.
On the top, there are two USB ports for external serial communication (mouse, keyboard, extra controllers). There is also a 5 LED indicator (blinks randomly on boot, battery level indicator, volume indicator, screen brightness) as well as the ON/OFF button (press once for battery level). Using the button sequence select+up will turn on the LED to full brightness to be used as a flashlight (it's blinding!). On the bottom, there is a micro USB used to charge the internal 10,000mAh battery which runs the whole show. The battery is wired to the source and gate of a PMOS transistors when you turn the device on the battery to gate disconnected and the gate is now shorted to ground through a 1M ohm resistor turning it to the ON state. Power down sequence is done by holding the top ON/OFF button which fires an interrupt after being held for 5 seconds to enter the shutdown sequence. There is a 3.5mm headphone jack which cuts power from internal speakers and redirects it through this port when in use. Lastly, there is an HDMI out port on the bottom which disables the 7-inch touch screen and redirects the video and audio to the new source. On the front, we have all the buttons and touchscreen. A neat feature is the “home button” which takes the user back to the main screen to choose what console and game to play by internally sending a signal to the Pi to mimic shorting of start and select. Volume is controlled by the two tactile buttons which increment and decrement the volume through a daemon running called "triggerhappy" which follows the script I wrote to send the correct gain adjustment to amixer. Brightness is controlled similarly by holding select + the two tactile buttons this time to adjust the value in /sys/class/backlight/rpi_backlight/brightness. The LED indicator is controlled solely by the Teensy microcontroller. Debounce for the buttons is written into the software.
My future plans for this device are to have secret “Easter eggs” where you can hold certain buttons on boot to enter the CLI or Linux GUI instead of the default emulation software. I also want to make hardware shortcuts for changing settings rather than plugging in a keyboard and typing the command. I also want to develop an audio card to filter out the high-frequency pop that occurs before the start of each game and unify the dB gain between each console. Lastly, I want old arcade games to be able to be played vertically to get the most vertical screen space. This would mean physically turning the device sideways using the right analog as your directional (everything would be adjusted 90 degrees CCW) and ABXY as any of your buttons.
In hindsight, I wish I did the HDMI out port with a PCB instead of a pre-bought female wall mount. This would have saved on a lot of space in actuality I had to tuck the cable in a spiral to avoid cutting it and re-soldering the 19 wires. I am torn about going with a smaller battery because the cell height was my limiting factor in the thickness of the entire device. However, reducing this would negatively impact my battery life.
In total, this costs me around $350 to make. This does not include the raspberry pi I broke trying to shave down the size... Still happy I tried it out. It was a fun summer project to see if I could make it as compact as possible while at the same time fitting a lot of cool features inside.
Installing ROMs is a legal grey area. Many online sources state you can download games if you own physical copies or if they are in the public domain. Another thing on this subject, I want to make it clear that I will not be selling or producing any more of these. It was a one time build for personal use.
In the end, you can't beat the experience of playing the original games on their true hardware. The system I created takes my favorite childhood games and makes them portable. However, every now and then I still dust off my old consoles to play again.
Feel free to ask me a question in the comments box below!
Comment Box is loading comments...